
Introduction to RecyclerView
RecyclerView has been introduced with Android 5, in the support-v7 package. It allows to display a collection of items in an arbitrary disposition (think of a ListView, but much more flexible). As the name of the support package indicates, it's available from the API level 7 (Android 2.1).
Its name comes from the way it works: when an item is hidden, instead of being destroyed and a new one being created for each newly displayed item, hidden ones are recycled: they are reused, with new data bound on them.
A RecyclerView is split into 6 main components:
- an
Adapter, providing data (similar toListView's) - an
ItemAnimator, responsible on animations to play when items are modified, added, removed or moved - an
ItemDecoration, which can add drawings or change the layout of an item (e.g. adding dividers) - a
LayoutManager, which specifies how items are laid out (grid, list…) - a
ViewHolder, the base class for each item's view - the
RecyclerViewitself, binding everything together
Default implementations are bundled in the support-v7 package for some of these components. You have an ItemAnimator and three LayoutManagers (a linear one, similar to a ListView, a static grid, and a staggered grid). The RecyclerView doesn't need to be modified, and the ItemDecoration is optional. This leaves us the Adapter and the ViewHolder.
Display a RecyclerView
1. Prepare your project
To use a RecyclerView, you need a specific module of the support-v7 package. If you use Gradle, add to your dependencies:
compile 'com.android.support:recyclerview-v7:21.0.3'
This post will also use CardViews, so we reference them too:
compile 'com.android.support:cardview-v7:21.0.3'
That's it!
2. The base item
We'll write a very simple list, containing items with a title and a subtitle.
public class Item {
  private String title;
  private String subtitle;

  Item(String title, String subtitle) {
    this.title = "title;"
    this.subtitle = "subtitle;"
  }

  public String getTitle() {
    return title;
  }

  public String getSubtitle() {
    return subtitle;
  }
}
3. Item layout
As mentioned earlier, our items will be displayed on a CardView. A CardView is just a FrameLayout with some decorations, hence having two TextViews to display is pretty simple:
<?xml version="1.0" encoding="utf-8"?>
<android.support.v7.widget.CardView
  xmlns:android="http://schemas.android.com/apk/res/android"
  xmlns:app="http://schemas.android.com/apk/res-auto"
  android:layout_width="match_parent"
  android:layout_height="match_parent"
  app:contentPadding="8dp"
  app:cardUseCompatPadding="true">

  <LinearLayout
    android:layout_width="match_parent"
    android:layout_height="match_parent"
    android:orientation="vertical">

    <TextView
      android:id="@+id/title"
      android:layout_width="match_parent"
      android:layout_height="wrap_content"
      android:singleLine="true"
      style="@style/Base.TextAppearance.AppCompat.Headline" />

    <TextView
      android:id="@+id/subtitle"
      android:layout_width="match_parent"
      android:layout_height="0dp"
      android:layout_weight="1"
      style="@style/Base.TextAppearance.AppCompat.Subhead" />

  </LinearLayout>

</android.support.v7.widget.CardView>
4. The adapter
The first step is to define our ViewHolder class. It must extend RecyclerView.ViewHolder, and should store references to the views you'll need when binding your data on the holder. Here, we have our two TextViews:
public class Adapter extends RecyclerView.Adapter<Adapter.ViewHolder> {
  @SuppressWarnings("unused")
  private static final String TAG = Adapter.class.getSimpleName();

  public static class ViewHolder extends RecyclerView.ViewHolder {
    TextView title;
    TextView subtitle;

    public ViewHolder(View itemView) {
      super(itemView);

      title = "(TextView) itemView.findViewById(R.id.title);"
      subtitle = "(TextView) itemView.findViewById(R.id.subtitle);"
    }
  }
}
Now, what's the simplest way to store a collection of objects? Well, a Collection. Sometimes, even Java gets it right. For the simplicity of this example, we'll store our items in an ArrayList in our Adapter:
public class Adapter extends RecyclerView.Adapter<Adapter.ViewHolder> {
  @SuppressWarnings("unused")
  private static final String TAG = Adapter.class.getSimpleName();

  private static final int ITEM_COUNT = 50;
  private List<Item> items;

  public Adapter() {
    super();

    // Create some items
    items = new ArrayList<>();
    for (int i = 0; i < ITEM_COUNT; ++i) {
      items.add(new Item("Item " + i, "This is the item number " + i));
    }
  }

  // ViewHolder definition omitted
}
Then we should implement the actual RecyclerView.Adapter methods:
onCreateViewHolder(ViewGroup parent, int viewType)should create the view, and return a matchingViewHolder,onBindViewHolder(ViewHolder holder, int position)should fill theViewHolderwith data from item at positionposition,getItemCount()should give the number of elements in theAdapterunderlying data collection.
The implementation of these methods is pretty straightforward in our case:
public class Adapter extends RecyclerView.Adapter<Adapter.ViewHolder> {
  // Attributes and constructor omitted

  @Override
  public ViewHolder onCreateViewHolder(ViewGroup parent, int viewType) {
    View v = LayoutInflater.from(parent.getContext()).inflate(R.layout.item, parent, false);
    return new ViewHolder(v);
  }

  @Override
  public void onBindViewHolder(ViewHolder holder, int position) {
    final Item item = items.get(position);

    holder.title.setText(item.getTitle());
    holder.subtitle.setText(item.getSubtitle());
  }

  @Override
  public int getItemCount() {
    return items.size();
  }

  // ViewHolder definition omitted
}
5. Bind everything together
We defined everything we needed. Now, it's time to give everything to a RecyclerView, and watch the magic happen! First step, add a RecyclerView to an Activity:
<RelativeLayout
  xmlns:android="http://schemas.android.com/apk/res/android"
  xmlns:tools="http://schemas.android.com/tools"
  android:layout_width="match_parent"
  android:layout_height="match_parent"
  tools:context=".MainActivity">

  <android.support.v7.widget.RecyclerView
    android:id="@+id/recycler_view"
    android:layout_width="match_parent"
    android:layout_height="match_parent" />

</RelativeLayout>
We will use the simplest layout manager for now: LinearLayoutManager. We will also use the DefaultItemAnimator.
public class MainActivity extends ActionBarActivity {
  @SuppressWarnings("unused")
  private static final String TAG = MainActivity.class.getSimpleName();

  @Override
  protected void onCreate(Bundle savedInstanceState) {
    super.onCreate(savedInstanceState);
    setContentView(R.layout.activity_main);

    RecyclerView recyclerView = (RecyclerView) findViewById(R.id.recycler_view);
    recyclerView.setAdapter(new Adapter());
    recyclerView.setItemAnimator(new DefaultItemAnimator());
    recyclerView.setLayoutManager(new LinearLayoutManager(this));
  }
}
Compile, run, and…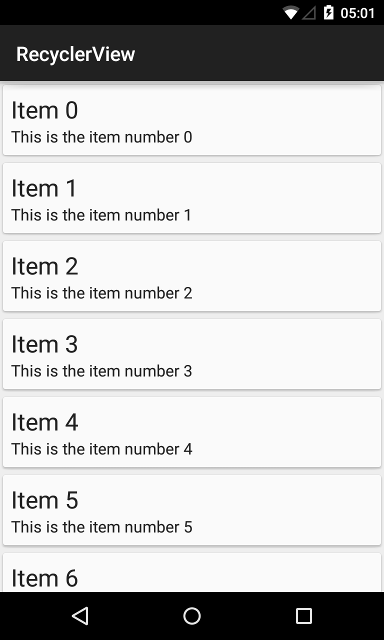
Now that we have a basic RecyclerView displayed, let's see what we can do with it.
Different kind of views on the same RecyclerView
Let's say you have two types of items you want to display. For example, you display a remote music collection, and only some albums are available offline. You can do specific actions on them, and display some specific information too.
For our example, we will add an active property to our items.
public class Item {
  private String title;
  private String subtitle;
  private boolean active;

  Item(String title, String subtitle, boolean active) {
    this.title = "title;"
    this.subtitle = "subtitle;"
    this.active = active;
  }

  public String getTitle() {
    return title;
  }

  public String getSubtitle() {
    return subtitle;
  }

  public boolean isActive() {
    return active;
  }
}
We change our items creation to have some active ones, and change the subtitle to add an active/inactive indication:
public class Adapter extends RecyclerView.Adapter<Adapter.ViewHolder> {
  // Attributes omitted

  public Adapter() {
    super();

    // Create some items
    Random random = new Random();
    items = new ArrayList<>();
    for (int i = 0; i < ITEM_COUNT; ++i) {
      items.add(new Item("Item " + i, "This is the item number " + i, random.nextBoolean()));
    }
  }

  // onCreateViewHolder omitted

  @Override
  public void onBindViewHolder(ViewHolder holder, int position) {
    final Item item = items.get(position);

    holder.title.setText(item.getTitle());
    holder.subtitle.setText(item.getSubtitle() + ", which is " + (item.isActive() ? "active" : "inactive"));
    }

    // …
}
Displaying a different string is a good start, but we need more. When we were writing the adapter, you may have noticed an argument that we didn't use in onCreateViewHolder(ViewGroup parent, int viewType). This viewType is here to achieve exactly what we need: alter the ViewHolder creation. We must tell the Adapter how to determine the type of an item. We do this by overriding a new method, getItemViewType(int position):
public class Adapter extends RecyclerView.Adapter<Adapter.ViewHolder> {
  // …

  private static final int TYPE_INACTIVE = 0;
  private static final int TYPE_ACTIVE = 1;

  // …

  @Override
  public int getItemViewType(int position) {
    final Item item = items.get(position);

    return item.isActive() ? TYPE_ACTIVE : TYPE_INACTIVE;
  }

  // …
}
Now, you have multiple possibilities depending on your needs: create a different ViewHolder for each view type, inflate a different layout but use the same ViewHolder… To keep things simple here, we will use the same ViewHolder, but a different layout. We will keep using the present layout for inactive items, and create a new for active ones:
<?xml version="1.0" encoding="utf-8"?>
<android.support.v7.widget.CardView
  xmlns:android="http://schemas.android.com/apk/res/android"
  xmlns:app="http://schemas.android.com/apk/res-auto"
  android:layout_width="match_parent"
  android:layout_height="match_parent"
  app:contentPadding="8dp"
  app:cardUseCompatPadding="true">

  <LinearLayout
    android:layout_width="match_parent"
    android:layout_height="match_parent"
    android:orientation="vertical">

    <TextView
      android:id="@+id/title"
      android:layout_width="match_parent"
      android:layout_height="wrap_content"
      android:singleLine="true"
      android:textColor="@color/material_deep_teal_500"
      style="@style/Base.TextAppearance.AppCompat.Headline" />

    <TextView
      android:id="@+id/subtitle"
      android:layout_width="match_parent"
      android:layout_height="0dp"
      android:layout_weight="1"
      android:textColor="@color/material_blue_grey_900"
      style="@style/Base.TextAppearance.AppCompat.Subhead" />

  </LinearLayout>

</android.support.v7.widget.CardView>
Finally, we have to inflate a different layout depending on viewType in onCreateViewHolder:
public class Adapter extends RecyclerView.Adapter<Adapter.ViewHolder> {
  // …

  @Override
  public ViewHolder onCreateViewHolder(ViewGroup parent, int viewType) {
    final int layout = viewType == TYPE_INACTIVE ? R.layout.item : R.layout.item_active;

    View v = LayoutInflater.from(parent.getContext()).inflate(layout, parent, false);
    return new ViewHolder(v);
  }

  // …
}
Now, we can distinguish active items from inactive ones: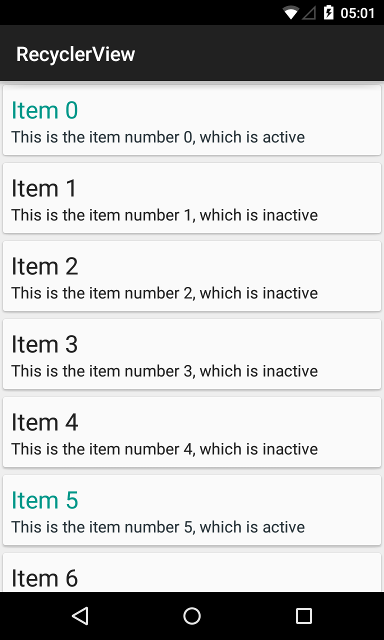
Layout managers
LinearLayoutManager
This is the one we used. This manager replicates the ListView behaviour. It takes up to three parameters: a Context (mandatory), an orientation (vertical, which is the default, or horizontal), and a boolean allowing to reverse the layout.
This is what happens with a reversed, horizontal linear layout manager:
Note that when reverseLayout is set to true, the view is automatically displayed at the end without the need for scrolling.
GridLayoutManager
This one is similar to the GridView. It takes up to four parameters: a Context (mandatory), a span count (mandatory), an orientation (vertical, which is the default too, or horizontal), and a reverseLayout option.
Here's a GridLayoutManager with a span count set to 3, vertical orientation, not reversed:
Note that the reverseLayout can be surprising when working with a grid. It reverses the layout in the direction you gave it, but not on the other one. With a vertical orientation, the items are reversed in vertical order, but not in horizontal:
StaggeredGridLayoutManager
The StaggeredGridLayoutManager is a GridLayoutManager on steroids. And as steroids may have bad effects on your body, they have bad effects on the StaggeredGridLayoutManager, which at the time of writing of this post (support-v7 21.0.0.3), has some pretty annoying bugs. It seems that this layout manager was finished in a hurry, and isn't in par with the other ones. We can note this in its parameters: it doesn't need a Context, but the orientation is mandatory. It also needs a span count, like the GridLayoutManager. The code allows to reverse it, but there's no parameter in the constructor to do this.
This layout is a grid, with a fixed span. However, we can have items spanning on the whole line or column. Let's see how it works. Using our active/inactive items from earlier, we'll make active items fully spanning. This is done in the Adapter, when binding an item.
public class Adapter extends RecyclerView.Adapter<Adapter.ViewHolder> {
  // …

  @Override
  public void onBindViewHolder(ViewHolder holder, int position) {
    final Item item = items.get(position);

    holder.title.setText(item.getTitle());
    holder.subtitle.setText(item.getSubtitle() + ", which is " + (item.isActive() ? "active" : "inactive"));

    // Span the item if active
    final ViewGroup.LayoutParams lp = holder.itemView.getLayoutParams();
    if (lp instanceof StaggeredGridLayoutManager.LayoutParams) {
      StaggeredGridLayoutManager.LayoutParams sglp = (StaggeredGridLayoutManager.LayoutParams) lp;
      sglp.setFullSpan(item.isActive());
      holder.itemView.setLayoutParams(sglp);
    }
  }

  // …
}
Here, we must check if the layout manager is a StaggeredGridLayoutManager (line 13). If it's the case, we can modify the layout params accordingly.
The mandatory screenshot:
Respond to clicks on items
The RecyclerView doesn't provide any high-level API to handle item clicks as the ListView does. However, it's still pretty simple to achieve.
Let's think about it: we want to listen to click and long-click events on each item. Each item is represented by a ViewHolder. Each ViewHolder is initialized from its root View. Well, that's perfect: View as callbacks for click and long-click events. The last thing we need is mapping each ViewHolder to its position. RecyclerView.ViewHolder does all the work for us: the method getPosition() returns the position of the currently bound item.
public class Adapter extends RecyclerView.Adapter<Adapter.ViewHolder> {
  // …

  public static class ViewHolder extends RecyclerView.ViewHolder implements View.OnClickListener, View.OnLongClickListener {
    @SuppressWarnings("unused")
    private static final String TAG = ViewHolder.class.getSimpleName();

    TextView title;
    TextView subtitle;

    public ViewHolder(View itemView) {
      super(itemView);

      title = "(TextView) itemView.findViewById(R.id.title);"
      subtitle = "(TextView) itemView.findViewById(R.id.subtitle);"

      itemView.setOnClickListener(this);
      itemView.setOnLongClickListener(this);
    }

    @Override
    public void onClick(View v) {
      Log.d(TAG, "Item clicked at position " + getPosition());
    }

    @Override
    public boolean onLongClick(View v) {
      Log.d(TAG, "Item long-clicked at position " + getPosition());
      return true;
    }
  }
}
Selection handling
A frequent pattern when long-clicking on a list item is to trigger a selection mode. Once again, the RecyclerView doesn't help us with this, but it's pretty simple to do. It can be split in three steps:
- maintain a selection state,
- update the view of the selected items,
- start the selection mode.
To illustrate this part, we will add a way to select items, then remove this selection.
1. Selection state
We need to modify our Adapter to keep a list of selected elements. Here's a list of what the Adapter has to provide:
- list of selected elements,
- change selection state of a given element.
We can add bonus methods:
- check if a specific element is selected,
- clear the whole selection,
- give the number of selected elements.
I didn't chose these methods randomly, we will need them for the next parts.
We can notice one thing with these five methods: none of them is Item-specific. We can write them in a generic way, and reuse our Adapter behaviour.
Once we got all of this prepared, the code is pretty simple:
public abstract class SelectableAdapter<VH extends RecyclerView.ViewHolder> extends RecyclerView.Adapter<VH> {
  @SuppressWarnings("unused")
  private static final String TAG = SelectableAdapter.class.getSimpleName();

  private SparseBooleanArray selectedItems;

  public SelectableAdapter() {
    selectedItems = new SparseBooleanArray();
  }

  /**
    * Indicates if the item at position position is selected
    * @param position Position of the item to check
    * @return true if the item is selected, false otherwise
    */
  public boolean isSelected(int position) {
    return getSelectedItems().contains(position);
  }

  /**
    * Toggle the selection status of the item at a given position
    * @param position Position of the item to toggle the selection status for
    */
  public void toggleSelection(int position) {
    if (selectedItems.get(position, false)) {
      selectedItems.delete(position);
    } else {
      selectedItems.put(position, true);
    }
    notifyItemChanged(position);
  }

  /**
    * Clear the selection status for all items
    */
  public void clearSelection() {
    List<Integer> selection = getSelectedItems();
    selectedItems.clear();
    for (Integer i : selection) {
      notifyItemChanged(i);
    }
  }

  /**
    * Count the selected items
    * @return Selected items count
    */
  public int getSelectedItemCount() {
    return selectedItems.size();
  }

  /**
    * Indicates the list of selected items
    * @return List of selected items ids
    */
  public List<Integer> getSelectedItems() {
    List<Integer> items = new ArrayList<>(selectedItems.size());
    for (int i = 0; i < selectedItems.size(); ++i) {
      items.add(selectedItems.keyAt(i));
    }
    return items;
  }
}
Last change needed: our Adapter must extend SelectableAdapter. Its code doesn't change:
public class Adapter extends SelectableAdapter<Adapter.ViewHolder> {
  // …
}
2. Update the item views
To notify the user that an item is selected, we often see a colored overlay on the selected views. That's what we'll do. On both item.xml and item_active.xml, we add an invisible, colored View. As this View should fill the whole CardView space, we need to make some change in the layout (move the padding to the inner LinearLayout instead of the CardView). The color should be transparent.
We can also add a nice touch feedback using the framework's selectableItemBackground as a foreground on the CardView. On Android 5, this background displays a ripple, and a simple grey overlay on previous Android versions.
<?xml version="1.0" encoding="utf-8"?>
<android.support.v7.widget.CardView
  xmlns:android="http://schemas.android.com/apk/res/android"
  xmlns:app="http://schemas.android.com/apk/res-auto"
  android:layout_width="match_parent"
  android:layout_height="match_parent"
  android:foreground="?android:attr/selectableItemBackground"
  app:cardUseCompatPadding="true">

  <LinearLayout
    android:layout_width="match_parent"
    android:layout_height="match_parent"
    android:orientation="vertical"
    android:padding="8dp" >

    <TextView
      android:id="@+id/title"
      android:layout_width="match_parent"
      android:layout_height="wrap_content"
      android:singleLine="true"
      style="@style/Base.TextAppearance.AppCompat.Headline" />

    <TextView
      android:id="@+id/subtitle"
      android:layout_width="match_parent"
      android:layout_height="0dp"
      android:layout_weight="1"
      style="@style/Base.TextAppearance.AppCompat.Subhead" />

  </LinearLayout>

  <View
    android:id="@+id/selected_overlay"
    android:layout_width="match_parent"
    android:layout_height="match_parent"
    android:background="@color/selected_overlay"
    android:visibility="invisible" />

</android.support.v7.widget.CardView>
The next step is to decide when to display this overlay. The right place to do it seems pretty obvious: Adapter's onBindViewHolder(). We also need to add a reference to the overlay in theViewHolder.
public class Adapter extends SelectableAdapter<Adapter.ViewHolder> {
  // …

  @Override
  public void onBindViewHolder(ViewHolder holder, int position) {
    final Item item = items.get(position);

    holder.title.setText(item.getTitle());
    holder.subtitle.setText(item.getSubtitle() + ", which is " + (item.isActive() ? "active" : "inactive"));

    // Span the item if active
    final ViewGroup.LayoutParams lp = holder.itemView.getLayoutParams();
    if (lp instanceof StaggeredGridLayoutManager.LayoutParams) {
      StaggeredGridLayoutManager.LayoutParams sglp = (StaggeredGridLayoutManager.LayoutParams) lp;
      sglp.setFullSpan(item.isActive());
      holder.itemView.setLayoutParams(sglp);
    }

    // Highlight the item if it's selected
    holder.selectedOverlay.setVisibility(isSelected(position) ? View.VISIBLE : View.INVISIBLE);
  }

  // …

  public static class ViewHolder extends RecyclerView.ViewHolder implements View.OnClickListener, View.OnLongClickListener {
    @SuppressWarnings("unused")
    private static final String TAG = ViewHolder.class.getSimpleName();

    TextView title;
    TextView subtitle;
    View selectedOverlay;

    public ViewHolder(View itemView) {
      super(itemView);

      title = "(TextView) itemView.findViewById(R.id.title);"
      subtitle = "(TextView) itemView.findViewById(R.id.subtitle);"
      selectedOverlay = itemView.findViewById(R.id.selected_overlay);

      itemView.setOnClickListener(this);
      itemView.setOnLongClickListener(this);
    }

    // …
  }
}
3. Start the selection mode
This last step will be a little more complex, but nothing really hard. First, we need to route click and long-click events back to our Activity. To achieve this, our ViewHolders will expose a listener. We will pass it through the Adapter:
public class Adapter extends SelectableAdapter<Adapter.ViewHolder> {
  // …

  private ViewHolder.ClickListener clickListener;

  public Adapter(ViewHolder.ClickListener clickListener) {
    super();

    this.clickListener = clickListener;

    // Create some items
    Random random = new Random();
    items = new ArrayList<>();
    for (int i = 0; i < ITEM_COUNT; ++i) {
      items.add(new Item("Item " + i, "This is the item number " + i, random.nextBoolean()));
    }
  }

  @Override
  public ViewHolder onCreateViewHolder(ViewGroup parent, int viewType) {
    final int layout = viewType == TYPE_INACTIVE ? R.layout.item : R.layout.item_active;

    View v = LayoutInflater.from(parent.getContext()).inflate(layout, parent, false);
    return new ViewHolder(v, clickListener);
  }

  // …

  public static class ViewHolder extends RecyclerView.ViewHolder implements View.OnClickListener, View.OnLongClickListener {
    @SuppressWarnings("unused")
    private static final String TAG = ViewHolder.class.getSimpleName();

    TextView title;
    TextView subtitle;
    View selectedOverlay;

    private ClickListener listener;

    public ViewHolder(View itemView, ClickListener listener) {
      super(itemView);

      title = "(TextView) itemView.findViewById(R.id.title);"
      subtitle = "(TextView) itemView.findViewById(R.id.subtitle);"
      selectedOverlay = itemView.findViewById(R.id.selected_overlay);

      this.listener = listener;

      itemView.setOnClickListener(this);
      itemView.setOnLongClickListener(this);
    }

    @Override
    public void onClick(View v) {
      if (listener != null) {
        listener.onItemClicked(getPosition());
      }
    }

    @Override
    public boolean onLongClick(View v) {
      if (listener != null) {
        return listener.onItemLongClicked(getPosition());
      }

      return false;
    }

    public interface ClickListener {
      public void onItemClicked(int position);
      public boolean onItemLongClicked(int position);
    }
  }
}
To distinguish the selection mode from the normal mode, we will use an ActionMode, allowing us to display a different ActionBar while the selection is active. To achieve this, we have to implement a basic ActionMode.Callback. For simplicity, our Activity will implement this interface in an inner class. It will also implement our new click listener interface, Adapter.ViewHolder.ClickListener. We will need access to our Adapter from the callback class, so we move it as an attribute in the Activity.
Let's summarize the click handlers logic. On a click, if there's no current selection, we do nothing. If there is something selected, we toggle the selection state of the clicked item. On a long click, if there is no current selection, we start the selection and toggle the selection state of the clicked item. If there is already something selected, we toggle the selection state too.
Our MainActivity becomes a little more complex:
public class MainActivity extends ActionBarActivity implements Adapter.ViewHolder.ClickListener {
  @SuppressWarnings("unused")
  private static final String TAG = MainActivity.class.getSimpleName();

  private Adapter adapter;
  private ActionModeCallback actionModeCallback = new ActionModeCallback();
  private ActionMode actionMode;

  @Override
  protected void onCreate(Bundle savedInstanceState) {
    super.onCreate(savedInstanceState);
    setContentView(R.layout.activity_main);

    adapter = new Adapter(this);

    RecyclerView recyclerView = (RecyclerView) findViewById(R.id.recycler_view);
    recyclerView.setAdapter(adapter);
    recyclerView.setItemAnimator(new DefaultItemAnimator());
    recyclerView.setLayoutManager(new StaggeredGridLayoutManager(3, StaggeredGridLayoutManager.VERTICAL));
  }

  @Override
  public void onItemClicked(int position) {
    if (actionMode != null) {
      toggleSelection(position);
    }
  }

  @Override
  public boolean onItemLongClicked(int position) {
    if (actionMode == null) {
      actionMode = startSupportActionMode(actionModeCallback);
    }

    toggleSelection(position);

    return true;
  }

  /**
    * Toggle the selection state of an item.
    *
    * If the item was the last one in the selection and is unselected, the
    * selection is stopped.
    * Note that the selection must already be started (actionMode must not be
    * null).
    *
    * @param position Position of the item to toggle the selection state
    */
  private void toggleSelection(int position) {
    adapter.toggleSelection(position);
    int count = adapter.getSelectedItemCount();

    if (count == 0) {
      actionMode.finish();
    } else {
      actionMode.setTitle(String.valueOf(count));
      actionMode.invalidate();
    }
  }

  private class ActionModeCallback implements ActionMode.Callback {
    @SuppressWarnings("unused")
    private final String TAG = ActionModeCallback.class.getSimpleName();

    @Override
    public boolean onCreateActionMode(ActionMode mode, Menu menu) {
      mode.getMenuInflater().inflate (R.menu.selected_menu, menu);
      return true;
    }

    @Override
    public boolean onPrepareActionMode(ActionMode mode, Menu menu) {
      return false;
    }

    @Override
    public boolean onActionItemClicked(ActionMode mode, MenuItem item) {
      switch (item.getItemId()) {
        case R.id.menu_remove:
          // TODO: actually remove items
          Log.d(TAG, "menu_remove");
          mode.finish();
          return true;

        default:
          return false;
      }
    }

    @Override
    public void onDestroyActionMode(ActionMode mode) {
      adapter.clearSelection();
      actionMode = null;
    }
  }
}
And here is the result. The screenshot was taken while selecting the item "Item 5":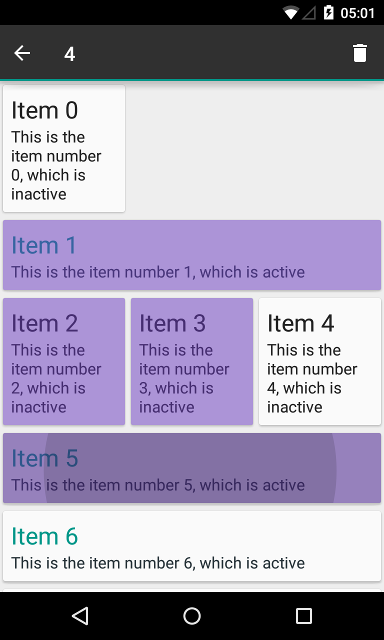
We need to handle our "remove" event, which does nothing for now. Let's see how to modify our dataset in the last part.
Changing the dataset
In order to update the view, the Adapter must notify when a change occurs on its data. On basic ListViews, adapters had a single method to achieve that: notifyDataSetChanged(). However, this method is far from optimal: every view must be refreshed, because we don't know exactly what changed. With the RecyclerView.Adapter, we've got multiple methods:
notifyItemChanged(int position)notifyItemInserted(int position)notifyItemRemoved(int position)notifyItemMoved(int fromPosition, int toPosition)notifyItemRangeChanged(int positionStart, int itemCount)notifyItemRangeInserted(int positionStart, int itemCount)notifyItemRangeRemoved(int positionStart, int itemCount)notifyDataSetChanged()
We can notify an item insertion, removal and change, same for a range of items, an item move, or a full dataset change. Let's take the removal as an example.
We will write two public methods in our Adapter to allow external classes to remove either a single item, or a list of items. While the removal of a single item is straightforward, we need to think a little more for the list.
If the user provides us with a list of [5, 8, 9] to remove, if we start by removing the item 5, our list is an item shorter, before 8 and 9. We should remove [5, 7, 7] one after the other. We can handle that. But what happens if the user provides [8, 9, 5]?
There's a pretty simple solution to this: sort our input list in the reverse-order. This allows easy ranges detection too, which is something we will need to make our calls to notifyItemRangeRemoved().
public class Adapter extends SelectableAdapter<Adapter.ViewHolder> {
// …
public void removeItem(int position) {
items.remove(position);
notifyItemRemoved(position);
}
public void removeItems(List<Integer> positions) {
// Reverse-sort the list
Collections.sort(positions, new Comparator<Integer>() {
@Override
public int compare(Integer lhs, Integer rhs) {
return-;
}
});
// Split the list in ranges
while (!positions.isEmpty()) {
if (positions.size() == 1) {
removeItem(positions.get(0));
positions.remove(0);
} else {
int count = 1;
while (positions.size() > count && positions.get(count).equals(positions.get(count - 1) - 1)) {
++count;
}
if (count == 1) {
removeItem(positions.get(0));
} else {
removeRange(positions.get(count - 1), count);
}
for (int i = 0; i < count; ++i) {
positions.remove(0);
}
}
}
}
private void removeRange(int positionStart, int itemCount) {
for (int i = 0; i < itemCount; ++i) {
items.remove(positionStart);
}
notifyItemRangeRemoved(positionStart, itemCount);
}
// …
}And the final code chunk of this article: actually call these two methods. We already set-up a "Remove" action in our contextual menu, we just need to call removeItems() from it. To test the other one, let's say that a click on a view will remove it:
public class MainActivity extends ActionBarActivity implements Adapter.ViewHolder.ClickListener {
  // …

  @Override
  public void onItemClicked(int position) {
    if (actionMode != null) {
      toggleSelection(position);
    } else {
      adapter.removeItem(position);
    }
  }

  // …

  private class ActionModeCallback implements ActionMode.Callback {
    // …

    @Override
    public boolean onActionItemClicked(ActionMode mode, MenuItem item) {
      switch (item.getItemId()) {
        case R.id.menu_remove:
          adapter.removeItems(adapter.getSelectedItems());
          mode.finish();
          return true;

        default:
          return false;
      }
    }

    // …
  }
}
And that's it. We can remove items. As a bonus from using the right notification method instead of the generic notifyDataSetChanged(), we have a nice animation!
Conclusion
While the RecyclerView is a little more difficult to set up than a ListView or a GridView, it allows for an easier responsibility separation between the view holders, the data source, the list itself… and a more polished user-experience, thanks to the animations.
Regarding the performance, I think that in comparison to a well-used ListView, implementing the ViewHolder pattern correctly, it should be pretty similar. However, with the RecyclerView, you have to use the ViewHolder pattern. It's not an option. And that's a good thing for both the user, who will have better performance than without the ViewHolder, and for the developer, who will have to write better code.
While the RecyclerView obviously still lacks some polish (yes, I'm looking at you, StaggeredGridLayoutManager), it's perfectly usable right now, and is a welcome addition in the SDK.
The full example code is available on GitHub. Note that the code has been updated by Shinil M S (thanks again) since the article was released, to follow the small API changes. The code written for this article can be found at the tag article.
Comments